- Home
- Bookkeeping Articles
- Bookkeeping Example
Bookkeeping Example
This bookkeeping example shows what happens step-by-step to business transactions in the bookkeeping records when they are entered into journals, ledgers, reports and cashbook. You can trace the money trail through the different forms / spreadsheets.
This example has screenshots of manual bookkeeping - using paper books and handwriting...
...and at the bottom of this article are screenshots from computerized bookkeeping software.

Bookkeeping Example - 2 Business Transactions
The process is illustrated using two business transactions.
1. Income Transaction
- On June 1 Jay, who owns The Cleaning Agency, receives a cash payment from his customer Mr Smith for $100 for sales invoice 1.
- Jay goes and deposits the cash into the bank and puts a copy of the deposit slip into the bookkeeper’s file back at his office.
2. Expense Transaction
- On June 2nd Jay buys a bottle of window wash from The General Store who issues him a receipt showing the details of the transaction (the date, description, amount and how it was paid).
- Jay pays with his business bank card. The payment is electronically processed through the General Store’s POS (point of sale) machine and the money is taken out of The Cleaning Agency’s business bank account (when Jay tapped his bank card on the POS terminal) and transferred into the General Store’s bank account.
- Jay puts the receipt into a folder at the office for the bookkeeper.
Bookkeeping Example - journals, ledgers and report
We must look at the cash deposit slip and the purchase receipt in the folder and enter the transactions into the books in the following order:
- Journals
- Ledgers
- Report
Journals and ledgers are books used in the double-entry method of bookkeeping.
The Cashbook topic is covered further down this page.
1. General Journal Bookkeeping Example
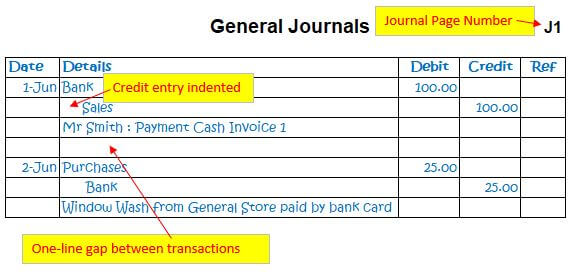
Journals are always done first before ledgers.
Journals show which ledger accounts will be changed by the transaction.
The source of information for the journal is the document; in this example it is the deposit slip and invoice for the income, and the General Store receipt for the expense.
Transactions are entered in date order going down the page of a journal book.
There is always a one-line gap between transactions.
When the page is full, turn the page over and carry on.
Every transaction has:
- a debit entry
- a credit entry, and
- a description line
…all placed one line under the other with no line spaces.
Some transactions might have more than one debit entry if one payment made covers different types of expenses.
Some transactions might have more than one credit entry if one payment received covers different types of income.
This bookkeeping example is just for one type of income and one type of expense.
The one income journal is split into two ledgers.
The one expense journal is split into two ledgers.
Income Transaction in the Journal
- The first line is the for the debit entry – the account that the money came out of to pay for the expense. In this bookkeeping income example, it is $100 to the Bank.
- The second line is for the credit entry – the account that the expense is allocated to. In this bookkeeping example, it is $100 to the Sales account. This entry in the Details column is indented which gives us the idea that it goes on the right-hand side of a ledger (when we get there).
- The third line is for the description of the income transaction. In this bookkeeping example it is a brief description of who paid, and the invoice number paid and payment method.
Expense Transaction in the Journal
- The first line is the for the debit entry – the account that the expense is allocated to. In this bookkeeping expense example, it is $25.00 allocated to the Purchases account.
- The second line is for the credit entry – the account that the money came out of to pay for the expense. In this bookkeeping example it is $25.00 from the Bank account. Once again, this credit entry in the Details column is indented so that it is easy to see compared to the debit entry and so we know it goes on the right-hand column of the ledger.
- The third line is for the description of the expense transaction. In this bookkeeping example it is a brief description of the item purchased and from where, along with method of payment.
So, you can see from this journal bookkeeping example that the Bank entry is flipped from a debit entry on the income transaction, to a credit entry on the expense transaction.
How do you know when to debit an account or when to credit it?
You can check how from our topic on debits and credits and get a cheat sheet.
2. General Ledger Bookkeeping Example
Once a transaction is entered as a journal, it is transferred to the general ledger accounts book using the journal as the source of information.
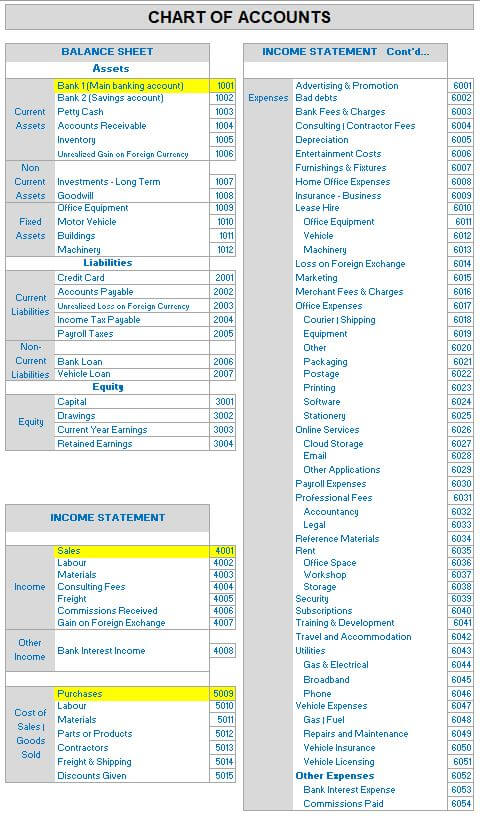
The ledger account numbers are set by the business and can be any numbering system – there is no hard rule about it.
Businesses that use bookkeeping software may find that the numbering system is already set by the software based on the software company’s numbering choice. However, they most often allow for the numbering system to be edited to your choice.
Below is our example of a manual chart of ledger accounts. The general ledger accounts used in the bookkeeping example on this page have been highlighted in yellow.
You can download a free PDF of the Chart of accounts by clicking on the graphic below.
Income Transaction in the Bank Ledger
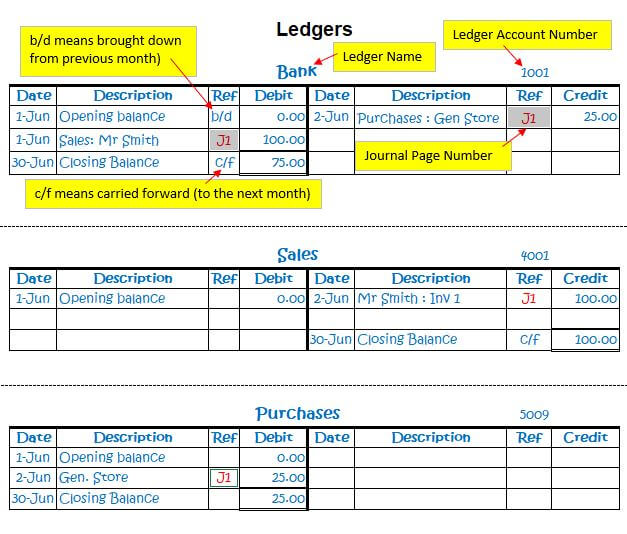
- Looking at our bookkeeping example for the Income journal we see that the first line is the debit entry for the Bank Account so we must find the ledger account page for the Bank.
- The entry must go on the debit side (left-hand column) of the Bank ledger page because the journal says it is the debit entry.
- Once it is entered, we write the ledger number (1001) next to the debit line in the journal which indicates it has been transferred to the ledger (also called ‘posted’).
- We also write the journal page number into the ledger next to the entry. In this bookkeeping example it is J1 (page 1)
Income Transaction in the Sales Ledger
- The next line of the journal shows that the Sales Account must be credited with $100.
- So we must find the Sales ledger account and enter the sale on the credit side (right-hand side) of the ledger.
- Then we write in the Sales account number (4001) next to the credit entry line in the journal to show we have posted it.
- Once again we must write the journal page number J1 into the ledger next to the entry.
You can find out more about the ledger books and formats here.
Expense Transaction in the Purchases Ledger
- Looking at our bookkeeping example for the Expense journal we see that the first line is the debit entry for Purchases, so we must find the ledger account page for the Purchases Account.
- The entry of $25.00 must go on the debit side (left-hand column) of the Purchases ledger page because the journal says it is the debit entry.
- Once it is entered, we write the ledger number (5009) next to the debit line in the journal which indicates it has been transferred to the ledger (also called ‘posted’).
- Not forgetting to write the journal page number J1 next to this debit ledger entry.
Expense Transaction in the Bank Ledger
- The expense journal indicates that the second line is the credit entry for the Bank Account so we must go back to the ledger account page for the Bank.
- The entry must go on the credit side (right-hand column) of the Bank ledger page because the journal says it is the credit entry.
- Once it is entered, we write the ledger number (1001) next to the credit line in the journal which indicates it has been transferred to the ledger (also called ‘posted’).
- Once more we write the journal page number J1 into the ledger next to the entry.
Memorize this:
Debits are always on the left-hand side of the ledgers.
Credits are always on the right-hand side of the ledgers.
At the end of the month the closing balance of each ledger is calculated so that we can produce a report.
The closing balances are generally written on the side of the ledger that corresponds to whether a debit or a credit increases that account.
- Debits increase the bank account (an asset)
- Credits increase the sales account (income)
- Debits increase the Purchases account (expense)
If the bank account went into overdraft then the closing balance would be on the right-hand side of the ledger.
The closing balance of the bank ledger on the last day of the month needs to be reconciled against the Statement of account from the bank. In other words, does the closing balance in the ledger match the closing balance of the bank statement.
3. Report Bookkeeping Example
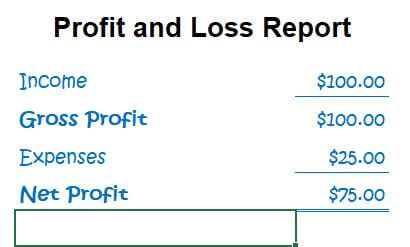
The final thing is to prepare a Profit and Loss Report at the end of the month to show to the business owner so he can see if he made a profit or a loss.
Of course, this bookkeeping example has only two transactions for the whole month, which is not realistic but simply serves to show you what happens.
We must look at the ledgers to get the figures for the report.
Income always goes first on the report, so in this example the Sales ledger total of $100 goes first on the report.
Then we know that next comes expenses and so the $25.00 on the Purchases ledger is entered onto the report.
The net profit is calculated by subtracting expenses away from income; it comes to $75.00.
Cashbook Bookkeeping Example
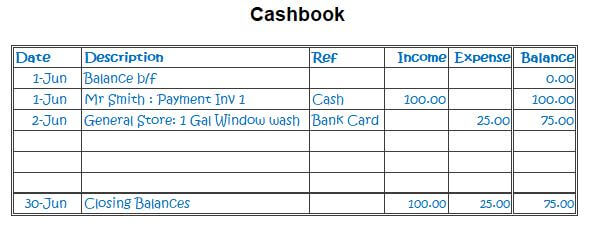
Another way to look at tracking business transactions through the bank is to keep a cash book.
A cash book is like a bank ledger but is formatted differently.
It is possible to maintain a manual cashbook for a small business and produce a Profit and Loss Report from just the cashbook without having journals and ledgers.
It’s called single-entry bookkeeping and is the simplest method of bookkeeping.
In this simple cashbook bookkeeping example, you can see that each transaction is entered in date order down the page with one description column, one income column and one expense column.
You could have a cashbook with more than one income or expense column as in this bookkeeping example below.
Learn more about cash books here.

Computerized bookkeeping example - Manager Accounting
Bank Transactions
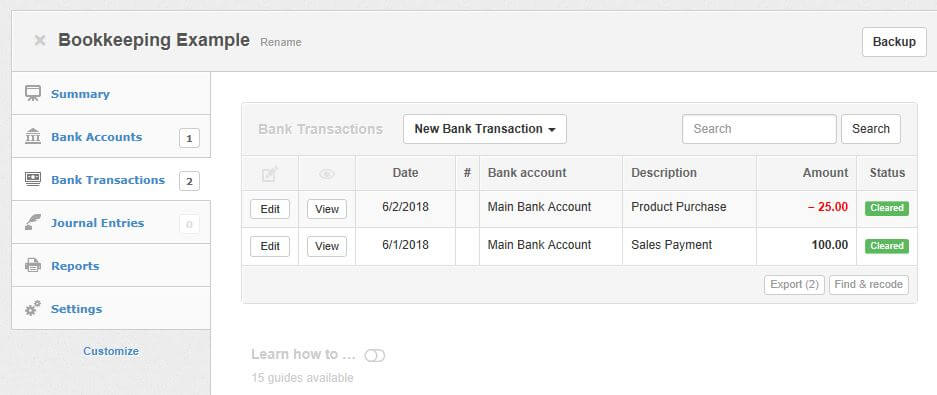
Here is a screenshot of the Bank Transactions window in the free Manager accounting software. This is the first place computerized business transactions are entered. They are not displayed like a manual journal book, but this is fine. The software knows where to 'post' everything. So this Bank Transactions window is kind of like your Journal or your Cashbook.
Bookkeeping Example for Computerized Journal Transactions
Manager does not show *journal entries for transactions entered in the bank transactions window. The general ledger in the example below shows the debit and credit accounts affected by the transactions.
(*Manager does allow manual journals to be entered if any of the ledger accounts need adjusting/correcting - these will not affect the bank balance).
Bookkeeping Example for Computerized Ledger Accounts
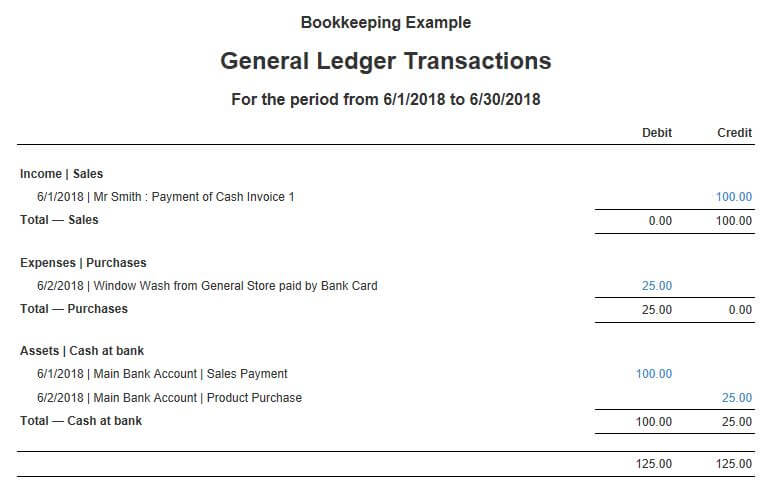
Looking at the above general ledger example you will see that:
- the Income | Sales transaction of $100 is in the Credit column and
- it is also in the Debit column under the Assets | Cash at Bank.
This is what we would expect to see because every debit should have a balancing credit and vice versa.

