- Home
- Business Bookkeeping Software
- Excel Cash Book
- Excel Cash Book Course
Excel Cash Book Course
welcome to the Free excel cash book course!
This Excel Cash Book course will help you to set up and use our free Excel Cash Book for your small business bookkeeping.
When you click on the orange button below it will take you to our website page where the free template is available for you to download, and there is an overview video and other information there.
To use Excel you must have your own Microsoft software, whether 'old school' desktop or Microsoft 365
But first... bookmark this course URL in your web browser so you can get back to it easily.
Once you have downloaded the template of your choice...
...there are four to choose from based on number of bank accounts and/or sales tax
and saved it to your device, come back here to get started with the course.
Or you can navigate to each Module from the right hand column (it will be at the bottom of this page if you're on a small screen).
There are some sections aimed at users of the template with sales tax. If you are not using that version you can skip over those sections.
Note about this Excel Cash Book Course
The images and videos in this course have been made using the Cash Book with one bank account. However, the concepts are the same for the other three versions of Cash Book.
MODULE 1 : EXCEL CASH BOOK COURSE
getting started
LESSON 1
The number one question I receive about Bookkeeping and the Cashbook is:-
“How do I get started?”
Maybe, this is you.
Maybe you’re nervous to start your accounts system yourself because you know nothing about bookkeeping!
Or maybe numbers aren’t really your thing.
There are countless reasons which could stop you thinking you can start your books yourself now in Excel, AND many tips to doing it right.
That’s exactly what this small Excel cash book course is going to help you with.
If at any time you have a question, and no question is too small or silly, please contact me.
why the cash book is simple
LESSON 2 MODULE 1
Nicky told me that she is just a beginner trying to learn as much she can from scratch for running her small café – she wants to get her bookkeeping right.
You can probably identify with Nicky.
I am going to lay out some basics for you so you can be confident you are on the right track.
Here is what makes this workbook simple to use:
The Cash Book is made up of several spreadsheets, called sheets or pages.
Everything you need to track your income and expenses is laid out in the different sheets of the cash book.
There's a sheet for the accounts, and a sheet for each month and a sheet with the P&L report on it.
The sheets are easy to find and access without being hidden behind a bunch of front-end menus.
This workbook doesn't have the same automated capability of coded bookkeeping software like QuickBooks, Xero, Sage or Wave.
There are some advanced options in Excel called Fields, Macros and VBA Coding which could provide more advanced automation (such as pressing a button to produce a report from the data you have entered) but I have left them out to keep it simple.
However, there’s nothing (except perhaps time) from stopping you learning how to automate some actions through Macros/VBA and adding them to your Cash Book yourself.
What is currently automated in the cashbook is this:
- Formulas which calculate your Totals i.e. Opening and Closing Balances of each month, Money In, Money Out, the Bank Balance
- All the usual functions from your Excel menus
is this double entry bookkeeping?
LESSON 3 MODULE 1
Moira wanted to know if the template is a double entry system.
The short answer is no. It’s a single-entry system.
There is no fussing over journals and ledgers which are all part of the double-entry system.
So, forget about double-entry for now.
A Cash Book in Excel can be enough as a bookkeeping record for a small business or sole proprietor or non-profit club.
You can get results from this single-entry Cash Book just by entering your daily numbers and producing a Profit and Loss Report (P&L).
the essentials
LESSON 4 MODULE 1
Tresha asked me: "If today were my first day ever of “keeping books”, where should I begin - what would be essential?"
So if you're brand new to bookkeeping, here is the answer to that question.
The most essential thing is to keep a record of what you are spending your money on for the business (expenses), and what your customers are paying you (income).
Each time you swipe or tap your bank card at a shop, or issue a check, or dole out the cash or set up an online payment, say to yourself "I have to record this in my books".
Each time you receive a bank payment, a check/cheque, online payment or cash, say to yourself "I have to record this in my books".
These payments received or paid out are called transactions.
The organized way to record each transaction is in date order.
Then each transaction has to be allocated to an account category (either an income or an expense).
The details for each transaction should include:
- the date
- the amount
- the name of vendor or customer
- the account category
You will keep the receipt or bill or invoice in your files to support the transaction - this is the paperwork. I have written here how to keep a good filing system.
The transactions for each income and expense account category are summarized.
The summary is called a Profit and Loss Report, also known as an Income Statement.
Why? Where is This Going?
The most basic reason is that the government taxation department wants to know how much to charge you by way of taxes.
They need to know your total income minus your total expenses for the year - the result (called a profit) is what the government calculates the taxes on.
Sometimes the result will be a loss - income tax normally doesn't apply in this case.
How the Excel Cash Book Achieves This
In the Excel cash book, the focus is on:
- the dates: each transaction is entered in the rows going down the pages in each month
- the account categories: the columns within each month which let you select the account category for each transaction amount
- and finally the summary P&L: a summary of all the totals from the account categories in month order.
- you also have the option to: track your business bank balance, perform bank reconciliations, and track your sales tax if this applies to your situation.
Your goal in the cash book is to:
- record each transaction
- do it in date order
- enter the amount into the appropriate account category
- look at the P&L result.
Now we'll get into setting up the cash book starting with the months.
MODULE 2 : EXCEL CASH BOOK COURSE
setting up the months
12 monthly sheets: financial year
LESSON 1
Every business, even sole proprietor traders, must operate within a financial year of 12 months.
That is why the cash book has 12 monthly sheets- Month1 to Month12.
Your financial year might start with January, or it might start with April or July. It depends where you live.
Read about the financial year here to find out more about that.
You will need to align the cash book with your financial year - the next lesson shows you how.
setting up the months' names
LESSON 2 MODULE 2
The Months Headers Sheet
The Months Headers sheet displays a table of months.
Each monthly name comes under a heading " Month1" or "Month2".
You can change the order of the months by typing over the names on the Months Headers sheet. (Don't type over the headings of 'Month1, Month2', just the names).
Currently, the names start with January (under Month1) and end with December (under Month12).
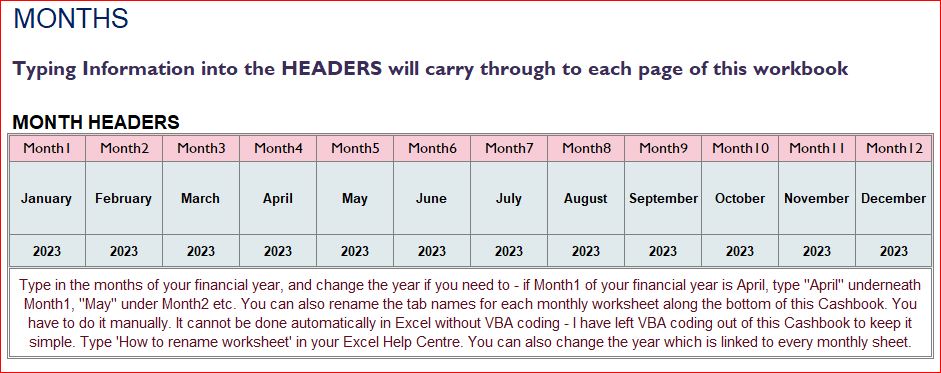 Months Headers: Excel Cash Book Course Image 1
Month1 does not have to start with January:
For example: if your financial year starts with April, replace the name January with the name April (still keeping it under the heading of Month1).
Replace the other months until your financial year is in order and ends with March under the heading Month12.
Each monthly sheet gets their name from this MonthsHeaders sheet. Changing the name on this sheet will change the name inside the relevant monthly sheet and within the P&L sheet, but it won't rename the tab of each sheet.
The tabs stay as Month1, Month2 etc. The only way to rename the tabs to a monthly name is to right-click the tab and rename it.
It's up to you if you want to rename the monthly tabs or just leave them as they are.
Important:
The monthly sheets 1-12 must stay in the order that they were in when you first downloaded the workbook otherwise your bank balances will go wrong and your Profit and Loss report won’t make sense.
You can rename the monthly tabs, just don’t move them!
 Sheet Tabs: Excel Cash Book Course Image 2
MODULE 3 : EXCEL CASH BOOK COURSE
setting up the accounts categories
it's all about the accounts
LESSON 1
The main objective of the Cash Book is to put your income and expenses into manageable categories and summarize the totals of those categories.
These categories are called ACCOUNTS.
In bookkeeping these accounts are kept in a Chart of Accounts
Open your Cash Book template to the sheet called Accounts|Headers. This is your 'chart' of accounts.
The Accounts are laid out in columns going across the page.
Income accounts are on the left under Money-In.
Expense accounts are on the right under Money-Out.
You must enter your account names into the Accounts|Headers sheet to keep the headings consistent throughout the workbook (rather than entering them individually into each monthly sheet).
The account headings link through to the top of each monthly sheet - see Row 4.
The column references are exactly the same on the Accounts|Headers sheet as per the monthly sheets - so column H is Income Account 1, column N is Income Account 7 and so it goes for all income and expense accounts.
The accounts on the Accounts/Headers sheet are also linked to the P&L going down Column C
Name your Accounts
Currently the accounts are called Income Account 1 or 2 and Expense Account 1 or 2.., this is just for you to know what they are when you first open the Cash Book.
But these are not standard Account names.
You must rename them. See example names below.
VIDEO: Accounts Overview
example list of accounts
LESSON 2 MODULE 3
Below is a list of accounts.
Choose ones you think you will need and type them in to the Accounts Headers in the Cash Book.
Follow this link to get a printable PDF version if you want to tick or highlight the accounts of your choice.
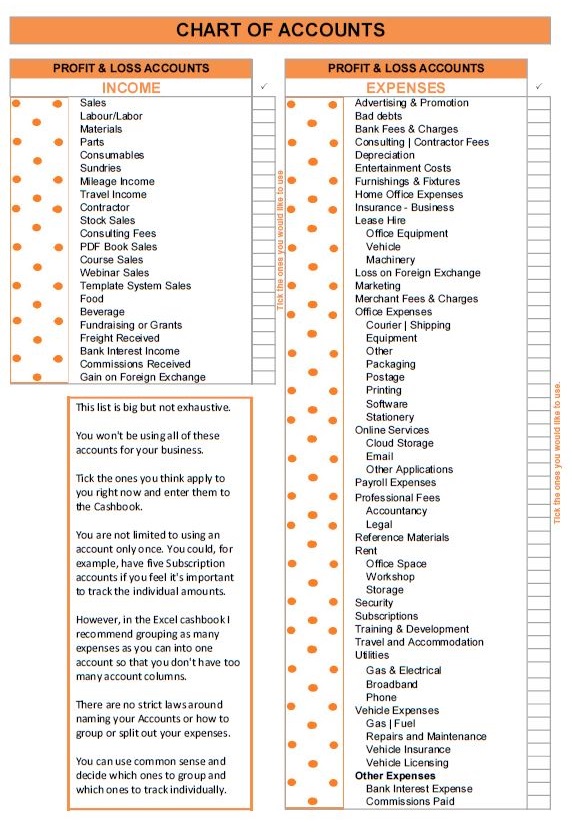 Accounts: Excel Cash Book Course Image 3
In the USA a small business may now be able to deduct the full cost of qualifying equipment in the first years as per Section 179 of the tax code, rather than claiming Depreciation over several years. This is very helpful to small businesses.
TIPS: Naming your accounts
LESSON 3 MODULE 3
- Try to type-in your accounts into the Cash Book in alphabetical order as this will help you find the account columns more easily when entering your financial data.
- To keep the layout of the 12 monthly sheets consistent, new accounts columns should be added to all 12 sheets, not just one (see the video below)
- You can add new account columns or delete or hide columns you don't want to use. The next few video lessons will help you get this right.
- I previously mentioned that you can remove unwanted accounts, but you must make sure you have not used these accounts by entering transaction amounts in them. If you have added transactions you must move them to different account columns and then you can remove them, so that your bank balance or the P&L does not get affected. Or just leave them as is until you start your new financial year where you can leave the account out altogether.

VIDEO: Add new accounts to monthly sheets
VIDEO: Add new accounts to the P&L
VIDEO: Delete/hide excess accounts
MODULE 4 : EXCEL CASH BOOK COURSE
setting up the sales tax
LESSON 1
Sales tax rates
On the Sales Tax Rates sheet you must enter your sales tax percentage/s.
Any unused cells must have a dash left in it so that Excel can differentiate between 0% rates and no rates when preparing the sales tax report.
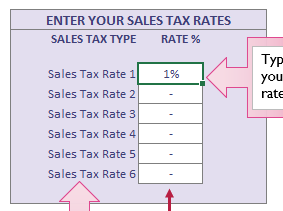 Sales Tax: Excel Cash Book Course Image 4
Each cell in the sales tax rates column inside the Monthly sheets is linked to this rates table using a drop-down selector.
MODULE 5 : EXCEL CASH BOOK COURSE
Understanding the P&L (profit and Loss Report)
Overview of the P&L
LESSON 1
Note: If you are using the cash book with sales tax features the P&L displays the figures excluding sales tax.
This report also goes by these names:
- Income Statement or
- Statement of Financial Performance, which is a bit of a mouthful!
This report is straight-forward and easy to learn.
The goal of this report is to provide you with a summary of all your Income and Expenses and provide you with a profit or loss result.
The calculation is:
- Income minus Expenses equals Profit or Loss.
If your Income is more than your Expenses, your result will be a profit.
If your Expenses are more than your Income your result will be a loss.
The red font indicates a loss or negative numbers in this Cashbook.
The profit or loss result forms the basis upon which your income tax is calculated.
VIDEO: Overview of the P&L
Non-Deductible Expenses
LESSON 2 MODULE 5
By law, some types of expenses are called non-deductible expenses because they are not directly part of income earning activities.
They must be left out of the profit and loss calculations.
The same goes for money paid in that isn’t part of sales income, like a loan paid to you by your bank, or personal money you have introduced into the business.
As a user of this Cash Book you have to enter these non-deductible amounts if:
- they came out your business account and
- you are tracking the bank balance in the Cash Book
How should you manage these in the Cashbook so they don’t affect your profit?
There are two options:
Option One
Insert new account columns but don’t link the totals to the P&L.
This way, your bank account column will still balance and your P&L will be correct so you don’t have to make adjustments
or
Option Two
- Use the account columns currently in the Cash Book that are already linked to the P&L.
- Enter the non-deductibles into the monthly income or expense account columns of your choice with appropriate names.
- Use the Adjustments section at the bottom of the P&L and enter these non-deductibles (totals only) again – the formula here removes them from the calculations to give you a final and correct profit or loss result.
What normally happens with these in Bookkeeping?
They go on to a Balance Sheet.
But this Cash Book Easy does not have a Balance Sheet. You don't require a Balance Sheet to work out your profit results.
So, don’t think about the Balance Sheet now.
Just know, non-deductible expenses and the non-income derived payments received must be excluded from your P&L calculations - this includes the sales tax portion of income and expenses which goes on to the Balance Sheet also.
Chart: Non-Deductible Expenses
LESSON 3 MODULE 5
Here is a chart of the non deductible expenses. Click here to get a printable version.
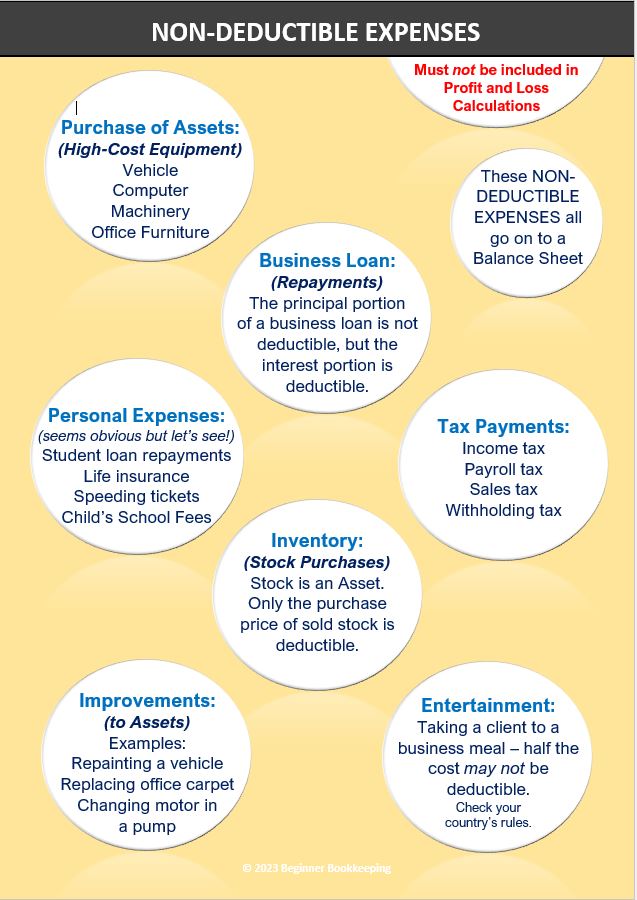 Non Deductibles: Excel Cash Book Course Image 5
MODULE 6 : EXCEL CASH BOOK COURSE
entering your data
How often should you update the cash book?
LESSON 1
Most people I know are very pressed for time.
The thought of using precious time to learn and do the bookkeeping may seem like wasting time or just plain daunting.
I have even heard some people would much rather go to the dentist!
But not you.
Updating your Cash Book, a minimum of once a month is the best thing for you and your business.
But how to fix the time issue…
The truth is, once this initial set-up is done.
And you understand the lay-out of the Cash Book.
It could take up to about an hour per month to update - it depends on how many transactions you have.
All that’s left is to make a recurring date in your diary.
You could do this bookkeeping for just one solid hour or more per month.
But there is nothing stopping you from updating your Cash Book every morning for the day before, or once a week for the week before.
If you have to catch-up a few months’ worth of entries, you will need a few hours depending on how many transactions you have.
no bank account for your business?
LESSON 2 MODULE 6
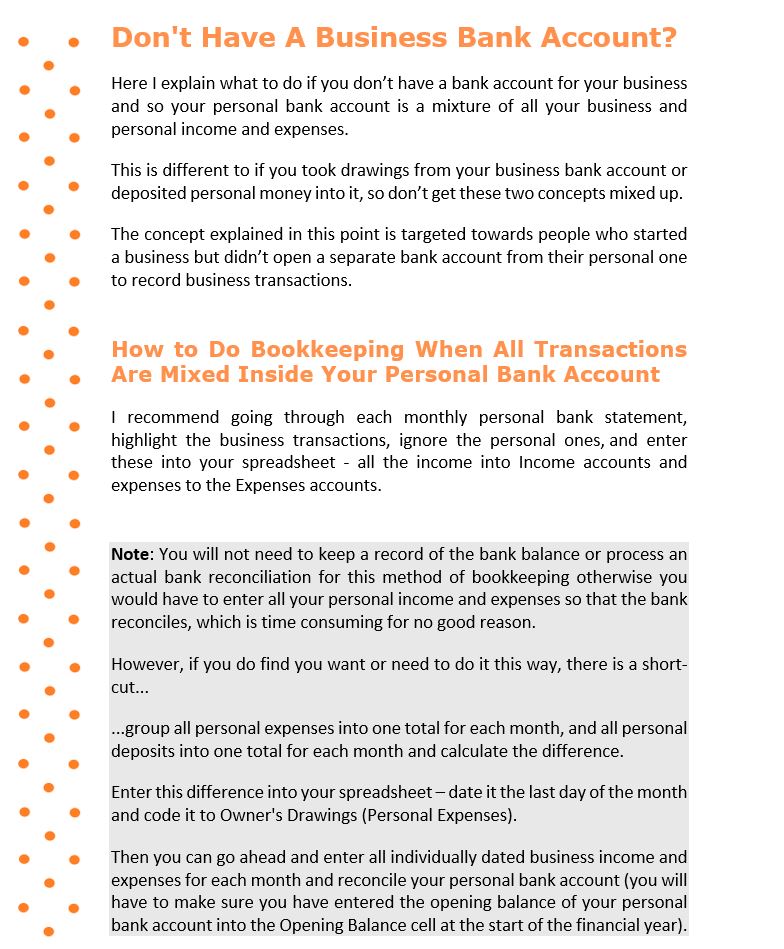
What if you don’t have a business bank account separate from your personal account?
Here is how to split out your business income and expenses from your personal bank account.
 No Business Bank: Excel Cash Book Course Image 6
You can see an example of transactions highlighted on a bank statement in Tip 3 on this page.
With this method there is no need to track the bank balance in the Cash Book.
You will enter in the income and expenses for the business and ignore the bank balance column.
enter opening balance first
LESSON 3 MODULE 6
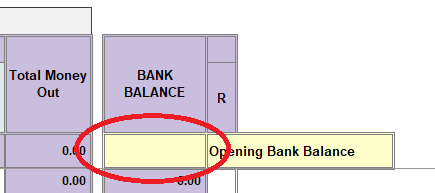
If you are tracking the bank balance for your business bank account and have an opening bank balance you must enter this first.
Login to your bank to find your opening bank balance for your starting month, or get ready with your bank statement for the month you are starting from.
The opening bank balance must be entered to Cell AM5 of the month you are starting from (this cell reference may have changed if you added more accounts or deleted excess ones).
 Opening Balance: Excel Cash Book Course Image 7
The rest of the cells in column AM will automatically be populated with this balance which will increase or decrease with each income or expense entry you type in.
Watch the video in the next lesson.
VIDEO: Opening Balance
Enter Income and Expenses
LESSON 4 MODULE 6
Now you can work your way down your bank statement and enter all your income and expenses in date order.
The Example sheet in the Cash Book gives you an idea of how to do it.
I recommend entering one transaction per row.
If for example, you have 5 transactions in one day you will use 5 rows – it doesn’t matter if they are all dated the same – you can use as many rows as you want for one day of income or expense transactions.
If you run out of rows you can insert more but you will have to update the formulas.
Scroll down here a little to see the video on inserting rows.
Inserting more rows
LESSON 5 MODULE 6
It is possible to enter more rows if the number already set in each Monthly sheet is not enough for you.
Select the row below where you want to insert a new one.
Right click > insert
Into your new row, you will need to:
- enter the formulas into the Total Money In column
- and into the Total Money Out column
- Update the formulas in the Bank Balance column from the new row all the way down to the final row.
Enter personal funds used to pay business expenses
LESSON 6 MODULE 6
Sometimes, you might have a business bank account but for whatever reason you used personal funds to pay for some business expenses. This lesson shows you how to enter these types of transactions without messing up the business bank balance.
The Example Sole Owner sheet has an example.
An Income account called Owner's Deposit (Capital) is used, and in the same row the same amount is entered into the relevant Expense account - this could also be split over several expenses.
The quickest way to do this is to group all these types of purchases from the whole month into one date - the last day of the month - using one row. But if you want to show them individually at the exact date of purchase, go ahead. Remember to also use the Owner's Deposit account for each one.
This type of entry does three things:
- shows the expenses on the P&L report so you can claim them to reduce your taxes.
- shows the source of funds was not this bank account but some other source.
- keeps the bank balance in this Cash Book neutral.
You will need to make an entry in the Adjustments section of the P&L to exclude the Owner's Deposit (Capital) amount from the Profit calculations.
Enter Income and Expenses with sales tax
LESSON 7 MODULE 6
There are four columns for Income that are dedicated to sales tax, and also another four columns that are dedicated to sales tax on Expenses. These are all within the Monthly sheets.
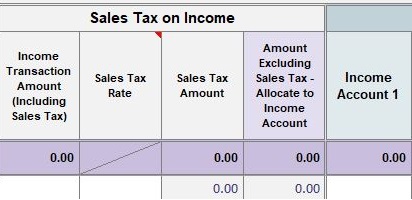 Sales Tax Rates on Income Columns: Image 8
- When entering transactions within the monthly sheets, every transaction must be first recorded into the Transaction Amount column whether an income or an expense, and must include sales tax.
- Then in the Sales Tax Rate column you will select your rate by clicking on the drop-down box which appears when you click in any cell in this column (remember to first enter your rates into the Sales Tax Rates sheet).
- The amounts in the Sales Tax Amount column will automatically calculate because there are formulas in those cells.
- The amounts in the Amount Excluding Sales Tax column will also automatically calculate because of the formulas...
- ...but then you must manually type in this amount to the appropriate income or expense account category.
The formulas in the Total Money In column will add up everything in the Income columns plus the amount in the Sales Tax Amount column, which you can see highlighted yellow in the image below:
 Formula Total Money In: Image 9
The formulas in the Total Money Out column are similar to the above and will add up everything in the Expense columns plus the amount in the Expense Sales Tax Amount column.
The Examples sheets in this template display all of the above so you can see how it works.
MODULE 7 : EXCEL CASH BOOK COURSE
Reconciling the cash book
The 'R' Column
LESSON 1
In the Cash Book, you will see a column headed R in every Monthly sheet.
This stands for “reconciliation” and is a simple tool for you to double-check that all your entries on your Bank Statement are in your Cash Book, and are the same amounts – they must match - and so must the Closing Balance.
Once you have confirmed that every entry in your bank account is also in your Cash Book, you can mark it with an R* for reconciled, or an X for checked or anything you want that will help you know you have checked it and it’s in both places.
If an entry isn't in both places, investigate why, or move on to the Reconciliation worksheet if it’s related to your checks/cheques or deposits.
*The reconciliation video at the end of this module shows you how to access the drop-down list to add your own letters.
How Often To Reconcile?
LESSON 2 MODULE 7
I recommend at least once a month in the first week of the month.
But you could do it once a week, or even every day.
The final thing is to check that the Closing Bank Balance for the month in the Cashbook matches your actual closing balance on the bank account.
The 'Reconciliation' Sheet
LESSON 3 MODULE 7
This Cash Book has a Reconciliation Statement sheet.
You only have to use it if you entered a check/cheque payment to a supplier in your Cash Book, but for some reason the supplier hasn’t deposited it before the end of the month so it isn’t showing up on your bank account.
Or if you entered a payment received from a customer into the Cash Book but you didn’t deposit it before the end of the month.
Here is a tutorial about bank reconciliations.
This Reconciliation sheet can be re-used.
You can either fill it in, then print it out or PDF it.
Or you can save copies of it to new sheets within the Cash Book for each month.
Tip: you could just wait until checks/cheques and deposits are actually showing up on the bank account before you enter them into the Cash Book.
Then you don’t have to bother with a Reconciliation worksheet.
But make sure you don’t forget about these types of payments! Your supplier might be very late in depositing your payment, you may forget about it and you may get a shock when your bank balance suddenly goes down when they finally remember.
Or if you forget about your customer payment, leave it sitting in a drawer, well you’ll just be leaving yourself short of funds, and the customer won’t be impressed if they suddenly get a shock at their reduced bank account months down the line when you suddenly remember to make the deposit.
MODULE 8 : EXCEL CASH BOOK COURSE
Profit vs Cash
Your Data is Entered. Now What?
LESSON 1
Once all your entries are in for a month, look at your Profit and Loss Report (P&L).
Have you made the necessary adjustments on the Adjustments section at the bottom of the P&L to remove any amounts that are non-deductible (Balance Sheet) type payments?
Did you make a profit?
Is there anything you think you can improve on?
If you made a loss:
- Are there any expenses you can cut back on?
- Or do you need to try and earn more money?
- Did you price and mark-up your products correctly to cover your costs?
Profit is more than your cash in bank?
LESSON 2 MODULE 8
This is a common question. A business owner might look at the P&L and see that the profit result is more than how much cash is in the bank.
The reason why is most likely because of the funds from the profit being spent on non-deductible business expenses talked about previously. When considering your cash flow, you do need to take into account those non-deductibles.
MODULE 9 : EXCEL CASH BOOK COURSE
Print | Save Tips
View or Print the P&L
LESSON 1
Custom Views
You have the option of showing only one month at a time on the P&L by using Custom View settings. Here's how:
- First make sure Freeze Panes is off. This is set to keep the Month headings locked in place when you scroll down the P&L. But it makes the P&L report look funky when combined with the Custom View settings so I recommend turning Freeze Panes off.
- Go to the top horizontal menu in Excel and select View > Freeze Panes > Unfreeze Panes - if you don't see Unfreeze panes then it probably means it's off already.
- Then, go to the top horizontal menu in Excel and select View > Custom Views > Select the Month you want to see.
- When you are done, go back to Custom Views and select P&L All Months.
Printing the P&L
Once a month I recommend printing your P&L to a PDF and saving it on your computerized filing system.
Call it P&L January 2023, for example if you've just finished with January.
Or print it out to your printer if you like paper filing.
Adjusting Print Settings
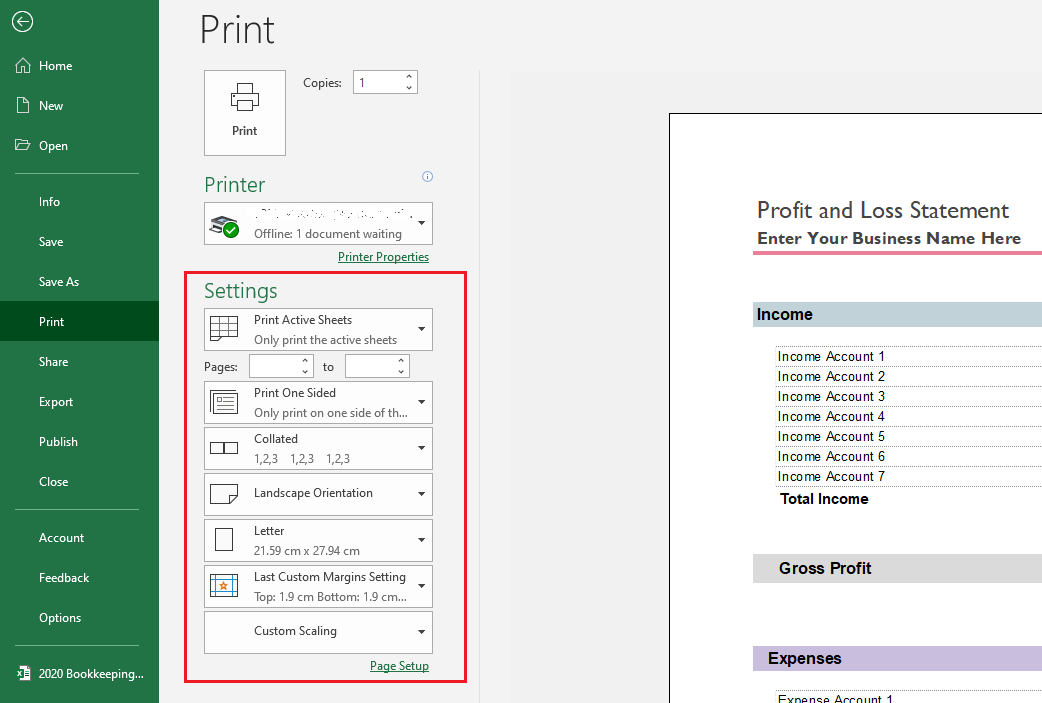
You may need to adjust the Print settings to get the P&L to fit nicely on to your paper size. Here are some tips for printing adjustments:
- Hide columns you don't need to see in your print-out
- Go to File > Print and work your way down the Settings
The main settings to focus on are:
- Orientation - you can have it as landscape or portrait
- Margins - change the margins to suit your requirements
- Scaling - there are different options in Scaling that you can play around with to make the page fit how you like. You could try Fit All Columns on One Page or you could go to Custom Scaling > Page and make it Fit to: 2 pages wide by 2 pages tall.
 Print Options: Excel Cash Book Course Image 8
Saving the Cash Book
LESSON 2 MODULE 9
Another recommendation I make is to save a copy of the Cash Book – it’s always good to have backups in case of system failures or computer crashes.
Save a copy to online storage like OneDrive or Dropbox or an external hard-drive and call it, for example, Cashbook January 2023, do this every month when you have completed a month.
MODULE 10 : EXCEL CASH BOOK COURSE
Sales Tax summary and Report
Sales Tax Summary Sheet
LESSON 1
This is a simple display of the total sales tax for income and expenses for each month.
These accounts usually go on the Balance Sheet but as there is no Balance Sheet in this template, I have displayed these accounts in this summary report.
You may find in your country that these accounts on the Balance Sheet would be called Sales Tax Collected and Sales Tax Paid.
These should match the Sales Tax Report when you run it for the specific months that you need to check.
Sales Tax Report and Data Sheet
LESSON 2 MODULE 10
Sales Tax Data Sheet
This sheet is the "data source" for the Sales Tax report.
You do not have to enter anything on this sheet because it automatically picks up all the data from your Monthly sheets using advanced formulas.
Columns O to Q have an Audit Check section which compares the totals on this Data sheet with the totals from each Monthly sheet; this helps ensure no totals have been missed. If the numbers in Column Q are not 0.00 you need to find what has happened (did you change any formulas on this sheet, or did you add hundreds of new rows on the Monthly sheets?)
Sales Tax Report
The Sales Tax Report is based on a pivot table.
In fact, there are two pivot tables: one for the Income and the other one along side it for the Expenses.
This report has an interactive feature in that you can select which months you want it to display, though you will have to do this for both pivot tables from the drop-down arrow buttons next to Select Month.
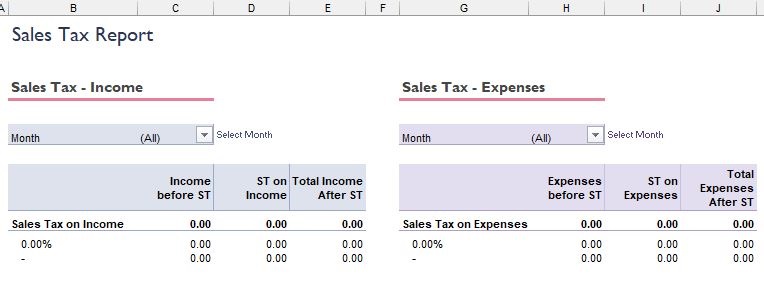 Sales Tax Report: Excel Cash Book Course Image 9
Before viewing this report, click on "Refresh"
Clicking refresh will help Excel update the data fed through to the report. There are several places to access the refresh button:
- Right click anywhere in the Income pivot table > select Refresh; then do the same in the Expenses pivot table.
- Or, from Excel's horizontal menu at the top of your screen, click Data > Refresh All
- Or, from Excel's horizontal menu at the top of your screen, click PivotTable Analyze > Refresh (once again, do this for both pivot tables.
MODULE 11 : EXCEL CASH BOOK COURSE
Starting a new financial year
What to do to start a new year
LESSON 1
You will start a fresh Cash Book, by either making a copy of your current one, renaming it to the new year and then deleting out all the monthly transactions you entered (just make sure you don't delete all the formulas).
Or you can get a fresh copy of the Cash Book from here, and re-type in all your accounts and the year.
Here is more information on the end of year/new year process in the Excel Cash Book.
Congratulations!
The Excel Cash Book Course is now complete.
