- Home
- Excel Bookkeeping Templates
- Cash Book Excel
Cash Book Excel
Features
This cash book Excel template is useful for small businesses to start their bookkeeping when on a tight budget and not ready to pay the monthly subscription costs for online bookkeeping software or the upfront outlay of hundreds for desktop software.
In this Cashbook you can:
- track income and expenses
- view a Profit and Loss Report
This Cashbook also has a Balance Sheet so you can track assets and liabilities including:
- bank and credit card balances
- inventory totals
- depreciation
- loans and loan repayments
- owner's equity
There is an Examples sheet with various transaction entries so you get an idea of how they should be entered.
Each template comes with a Help Guide which will take you through the set up of the template, tips on using the template, as well as bookkeeping tips along the way.
There are four templates to choose from:
- One bank account, no sales tax features
- Multi banks/credit cards, no sales tax features
- One bank account, including sales tax features
- Multi banks/credit cards, including sales tax features

1. Cash Book Excel 1 Bank account

2. Cash Book Excel Multi Bank Accounts& Credit cards

3. Cash Book Excel 1 Bank account
Including sales tax features

4. Cash Book Excel Multi Bank Accounts & Credit Cards
Including Sales Tax features

30 day money back guarantee on all purchases. Please check the Refund Policy.

30 day money back guarantee on all purchases. Please check the Refund Policy.
Cash Book Excel Sample Templates
Try a sample version for free if you want to check out the template first.
Instant download after selecting a button below.
You can enter data for two months and if you love it, buy the password unlock key so you can keep using the same workbook and get the Help Guide.
Note: More accounts cannot be added to the reports in these samples until unlocked.
Requirements on your device:
- You need to have Microsoft Excel on your computer which you can get through Microsoft 365, or you can use the free version of Excel online - just sign up for a Microsoft Account.
- Some knowledge of how to use Excel would be beneficial but if you know nothing, Excel has a really good 'Help' link with heaps of how-to information, or
- You can watch, for free, the videos I have prepared for Excel beginners on my Excel Tutorial Videos page.
cash book excel Overview
One Bank Account Template
- Track One Bank.
- 14 Income Accounts
- 10 Cost of Goods Sold Accounts
- 30 Expense Accounts
- 13 Balance Sheet Accounts
Note: More accounts can be added to each category - An Inventory balances worksheet
- A Bank Reconciliation worksheet
- A Depreciation worksheet
- A Profit and Loss Report
- A Balance Sheet Report
- Quick Start Tips
- An Examples page so you can see how it works
Version with Sales Tax Includes:
- 4 Sales Tax Columns Income
- 4 Sales Tax Columns Expenses
- Sales Tax rates fields
- A Sales Tax Report
- A Sales Tax Summary
- A Sales Tax Data sheet
Multi Bank Accounts Template
- Track up to Five Bank accounts and three credit cards.
- 14 Income Accounts
- 10 Cost of Goods Sold Accounts
- 30 Expense Accounts
- 13 Balance Sheet Accounts
Note: More accounts can be added to each category - Two columns for inter-bank or inter-credit card transfers and payments.
- An Inventory balances worksheet
- A Bank Reconciliation worksheet
- A Depreciation worksheet
- A Profit and Loss Report
- A Balance Sheet Report
- Quick Start Tips
- An Examples page so you can see how it works.
Version with Sales Tax Includes:
- 4 Sales Tax Columns
- 4 Sales Tax Columns Expenses
- Sales Tax rates fields
- A Sales Tax Report
- A Sales Tax Summary
- A Sales Tax Data Sheet
cash Book Excel Main Details
The Quick Start Tips gives you a summary of what to do first.
The main first things are to enter your financial year and months and your account names.
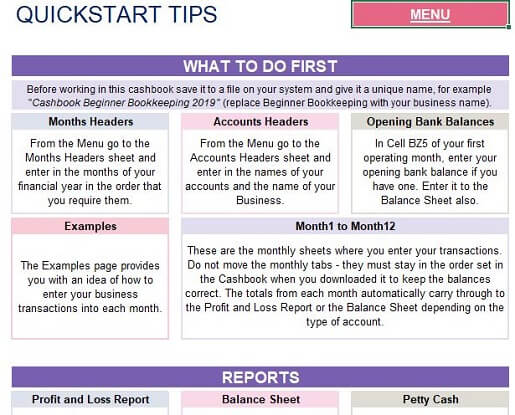 Cash Book Excel Quick Start Tips
There are 12 monthly sheets where you will enter your transactions for each month.
The totals from these sheets are linked to the reports so they update automatically.
The Examples page has data in it that will help you see how to enter your income and expenses and other type of transactions.
 Cashbook Excel Examples
Here are snips of the Profit and Loss Report and Balance Sheet Report.
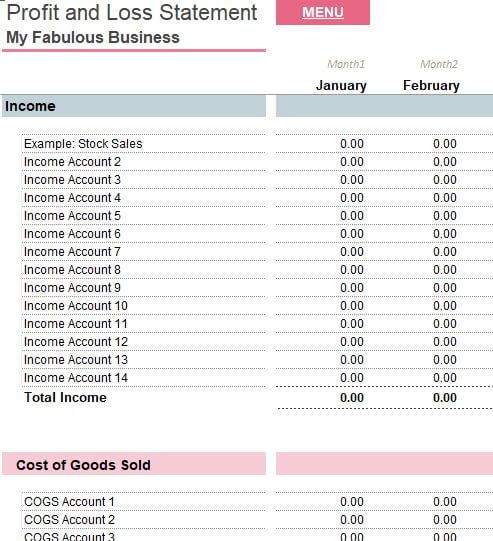 Cashbook Excel Profit and Loss Overview
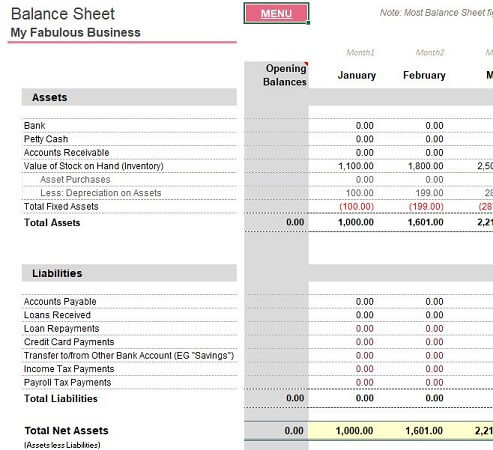 Cashbook Excel Balance Sheet Overview
The Inventory in this cash book in Excel is based on the Periodic method of tracking stock, so it will calculate your Cost of Goods Sold automatically, so long as you can enter your closing stock balances at the end of each month, or just do it once a year.
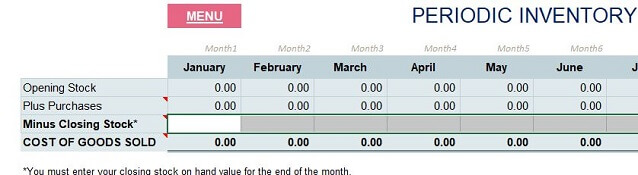 Cash Book Excel Periodic Inventory Screen Shot
The version with sales tax features includes the sales tax report which is made up of two pivot tables side by side, one for income and one for expenses.
You can select the months you want displayed and then they will list a total for each sales tax rate that you use.
 Cash Book Excel with Sales Tax - Sales Tax Report
You might prefer to try the free Excel Cash Book which doesn't have a balance sheet.

Got Questions or Want to Leave a Comment?
Contact Me
Latest Posts
-
10 Free Bookkeeping Courses to Understand Business Accounts
 These are the best free bookkeeping courses online for anyone in business who must understand business accounts. Learn the bookkeeping language, how to balance the books, how to manage finances, doubl…
 -
Accounts Receivable Journal Entries
 Accounts receivable journal entries: Debit Accounts Receivable, Credit Sales Income, and see other journals for sales returns, discounts, interest and write-offs.
 -
Accounts Receivable Procedures Step by Step
 7 accounts receivable procedures to manage credit sales effectively. Learn the best practices for invoicing, payment collection, and maintaining healthy business finances.